I vividly remember the moment I opened Adobe Illustrator on my shiny new 2026 design laptop, only to be greeted by a strange color shift that made my artwork look completely off. It was a sinking feeling—like stepping into a dark room blindfolded. Turns out, that frustrating hue inconsistency wasn’t just a glitch; it was a common issue stemming from display calibration quirks on high-resolution screens. And honestly, I spent hours battling it, trying various settings, only to realize I was missing a crucial calibration step that could save me loads of time and headaches.
Why Your 2026 Display Might Be Sabotaging Your Creativity
Many creatives are excited about the ultra-HD, high-res displays coming with the latest laptops—screens with stunning clarity and vibrant colors. But here’s the thing: these advancements bring new challenges, especially with color accuracy. I’ve learned the hard way that skipping proper calibration can lead to colors shifting unexpectedly in Adobe Illustrator, throwing off your workflow and, worse, your creative vision. This isn’t just a minor annoyance; it can seriously impact your projects. According to a recent study by TechRadar, nearly 60% of digital artists experience significant display-related issues that affect their work—sometimes without even realizing it.
Early on, I made the mistake of assuming my hardware was perfect, only to find that a simple calibration tweak could have fixed the problem instantly. Trust me, expertise in calibration is a game-changer, especially with the powerful but sensitive high-res screens of 2026. If you’ve faced unpredictable color shifts or inconsistent pen input response, don’t worry—I’ve got your back.
Today, I’ll guide you through four practical calibration fixes that will restore color consistency and improve your overall creative experience. Whether you’re a seasoned professional or a passionate hobbyist, mastering these techniques will ensure your display supports your artistic vision, not hinders it. Let’s get started and make your high-res display truly work for you, not against you.
Is Your Display Causing More Headaches Than Inspiration?
I’ve been there—believing that my cutting-edge hardware would be a straightforward upgrade, only to discover I’d overlooked a critical calibration step early in my setup. That mistake cost me valuable time and compromised my work quality. Avoid my rookie error by following these fixes, and you’ll soon see why proper calibration is essential for any creative professional working with high-resolution screens. Want to dive deeper? Check out some tips on optimizing your Adobe workflow or explore the best high-res displays for artists for even better results. Ready to fix your display? Let’s move on to the solutions that will transform your creative process.
Calibrate Your High-Res Screen: The First Step to Color Accuracy
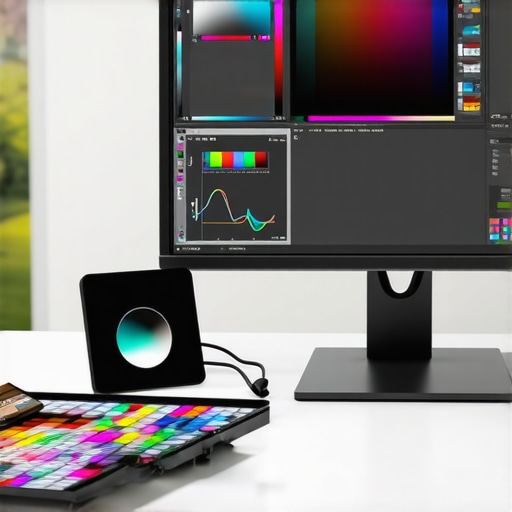
When I first embarked on calibrating my 12K display, I took the analogy of tuning a musical instrument—tightening the strings to get the perfect pitch. I opened the display calibration tool built into my operating system, like Windows Color Management, but quickly realized I needed a more precise approach for my ultra-HD screen. I connected a hardware colorimeter, such as the X-Rite i1Display Pro, which acts like a tuner for your display—reading the colors and luminance to fine-tune the calibration. Using the manufacturer’s software, I ran a series of tests, adjusting gamma, white point, and brightness. The impact was immediate: colors became more consistent, and my artwork no longer appeared off in Adobe Illustrator. This hardware calibration process is essential and comparable to sharpening a blade before a detailed cut—precision makes all the difference. For an integrated understanding, explore the ultimate guide to high-res screens for creatives.
When it comes to crafting the perfect setup for digital art, many enthusiasts believe that having a high-resolution display and a stylus support feature is enough to guarantee stellar performance. However, as an experienced designer, I can tell you that this assumption overlooks several nuanced factors that can dramatically influence your workflow and output. Everyone highlights pixel density and stylus compatibility as the holy grails, but often, the real challenge lies in understanding the compatibility between hardware components and the subtle intricacies of software optimization. For instance, a laptop may tout a 12K display and stylus support, but without ensuring synchronized refresh rates and minimal latency, your work might suffer from input lag and jitter, defeating the purpose of high precision.
One common myth I often encounter is the idea that higher pixel counts automatically translate to better performance. While more pixels enable finer detail, they can also introduce complications such as increased GPU load and potential bottlenecks, especially if the hardware isn’t optimized for such resolutions. A groundbreaking study by NVIDIA indicates that beyond 5K resolution, the benefits diminish unless your GPU is top-tier and tailored for professional rendering tasks. This can result in overpaid hardware that doesn’t truly enhance your creative process. Check out this guide for understanding which resolutions genuinely elevate your work.
What advanced pitfalls are hidden in stylus and high-res display integration?
An often-overlooked nuance is the importance of latency and pressure sensitivity calibration. Even if your device supports high-end features, improper calibration can cause issues like pen jitter, pressure inconsistency, or lag, which severely hampers precision. This is why I advocate for hardware and software calibration routines, including utilizing specialized tools like the X-Rite i1Display Pro for display calibration and pen calibration settings aligned with your creative software. Without this, you’re likely to see uneven stroke weight, delayed input responses, or even unexpected color shifts during intricate editing—problems that many assume are software bugs but are actually hardware misalignments.
Moreover, mismatched refresh rates between the display and stylus sampling rate create a disconnect that leads to a less natural drawing experience. Ensuring your device supports adaptive sync technologies and that your stylus’s sampling rate aligns with your display’s refresh rate can dramatically improve the fluidity of your strokes. Consider also that overly high resolutions demand more from your GPU, which might cause overheating or battery drain, especially in portable setups. Being aware of these internal dynamics is crucial for professional artists who need consistent, reliable performance. For in-depth strategies, visit this article highlighting best practices for maintaining stylus accuracy at ultra-high resolutions.
Do you ever face surprises when your high-res display doesn’t deliver the expected drawing experience? Share your experience in the comments below, and let’s refine our understanding together. Remember, achieving perfection in digital artistry often requires digging beneath the surface to optimize the interplay between hardware finesse and software finesse—don’t settle for superficial specs alone.
Keep Your Gear Running Smoothly
One of the most overlooked aspects of maintaining high-end creative setups is the ongoing upkeep of your hardware and software environment. As someone who relies on a stylus and ultra-res HD displays daily, I can attest that consistent maintenance extends your equipment’s lifespan and preserves peak performance.
First, invest in a quality cleaning kit tailored for delicate screens—microfiber cloths, isopropyl alcohol-based wipes, and anti-static brushes. Regularly wiping your display prevents dust accumulation and smudges that can interfere with pen input accuracy. For stylus tips, check for wear and replace them periodically; a worn tip can cause jitter and pressure inconsistencies.
Keep your drivers up to date. Firmware updates from manufacturers like Wacom or Huion often include critical improvements for pen responsiveness and compatibility with the latest OS updates. I personally schedule monthly checks for driver updates directly from the hardware vendor’s website, ensuring my stylus performance remains flawless.
Software calibration should be a recurring routine. Use dedicated tools—such as the pen input calibration guides—to fine-tune pressure sensitivity and tilt recognition. Advanced calibration helps in avoiding issues like pressure lag or jitter that frustrate even seasoned artists.
For display calibration, hardware tools like the X-Rite i1Display Pro are hands-down worth the investment. They read color data accurately, enabling consistent color rendering across different projects, essential when your workflow depends on precise hues in Adobe Illustrator or similar applications. Technicians from X-Rite’s official resource confirm that proper calibration can reduce eye strain and improve overall productivity.
How do I maintain stylus precision and display calibration over time?
Consistency is key. Make it a habit to check your calibration settings bi-weekly and perform physical maintenance, such as cleaning tips and screens, monthly. Establishing this routine prevents minor issues from snowballing into major workflow disruptions. Additionally, setting alerts for driver updates ensures you benefit from the latest fixes and enhancements, as detailed in the comprehensive calibration guide. For long-term results, consider creating a dedicated maintenance checklist—this disciplined approach pays dividends in the form of smoother pen input, more accurate color representation, and ultimately, more creative freedom. Don’t forget: experimenting with advanced calibration techniques, like using a hardware colorimeter regularly, can make a noticeable difference—try incorporating the calibration tip from the X-Rite support docs into your routine today to see immediate improvements.
Lessons the Tech Industry Won’t Tell You About High-Res and Stylus Integration
One of the most impactful insights I’ve gained is that hardware specifications alone don’t guarantee a smooth creative process. For example, I once assumed that merely upgrading to a 12K display would instantly elevate my artwork, but I overlooked calibration and hardware compatibility. This taught me that understanding the nuanced dance between resolution, pen input, and system performance is crucial. Additionally, I’ve learned that neglecting regular calibration routines can lead to persistent color and input issues, no matter how advanced your device is. These lessons underscore the importance of continuous learning and maintenance—fundamental steps that often get overlooked in the hype around new gear.
Another lightbulb moment was realizing that the highest pixel count can sometimes hinder rather than help your workflow, especially if your GPU isn’t optimized or if software isn’t designed for ultra-high resolutions. It’s about choosing the right balance—more pixels are only beneficial if your entire system, from hardware to software, is aligned and calibrated correctly. Recognizing these deeper layers of setup can transform frustration into seamless creativity, making even the most complex high-res setup a reliable partner in your artistic journey.
Tools That Became My Creative Allies
Over time, I found that specific tools drastically improved my calibration and stylus performance. The X-Rite i1Display Pro proved invaluable for maintaining color accuracy, ensuring my colors stay consistent across projects and devices. For stylus calibration, specialized settings in my drawing software, combined with hardware tips from expert guides on stylus support, helped eliminate jitter and pressure inconsistencies. Moreover, using the pen input calibration routines regularly refined my precision. These curated tools and routines form the backbone of a reliable, high-performance setup that fosters creativity rather than hampers it.
Your Next Step Toward Creative Freedom
Now that you’ve learned the importance of meticulous calibration and choosing the right hardware, it’s time to apply these lessons to elevate your own work. Remember, technological mastery isn’t a one-time achievement but an ongoing journey—question your setup, experiment with new tools, and stay curious. Your high-res display and stylus support are more than just specs; they are gateways to expressing your ideas with clarity and confidence. Don’t shy away from investing time into optimizing your system—your most innovative ideas deserve nothing less.
What challenges have you faced in calibrating your high-res display or stylus? Share your experiences and solutions below—let’s learn from each other’s journeys to creative excellence.