Have you ever stared at your screen in frustration, trying to make a digital brush stroke that feels just right, only to be betrayed by laggy response or blurry visuals? I remember those mornings vividly—dipping my stylus, only to watch my lines wobble or disappear into pixelated confusion. It was a lightbulb moment for me: I needed a setup that truly supported my creativity, not hindered it.
Why Choosing the Right Screen and Pen Tech Matters More Than You Think
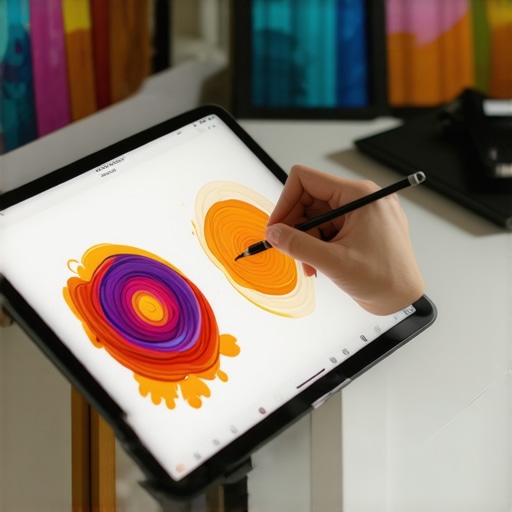
As a digital artist, your tools are your brushes and canvases. But unlike traditional art, the modern digital workspace relies heavily on hardware that bridges your vision and execution seamlessly. When your display isn’t sharp enough or your stylus doesn’t respond accurately, your entire workflow suffers. The right combination of high-resolution screens and stylus support can elevate your work, reduce frustration, and increase productivity. And trust me, investing in these features isn’t just about bragging rights; it’s about gaining a tangible edge in your creative process.
Feeling Skeptical? Think It’s Overhyped? Here’s Why That Might Be a Mistake
Early on, I made the mistake of buying a laptop with a lower-resolution display and minimal stylus support, thinking I could upgrade later. Big mistake. It slowed my workflow and dampened my creative flow. According to recent research, such as a report from Adobe, high-res screens and responsive pen input significantly improve artist accuracy and satisfaction, leading to better results and faster turnaround times. So, skimping now could cost you more in the long run.
In this guide, I’ll share practical insights and tips from my experience to help you navigate the murky waters of choosing a design laptop that truly supports your artistic ambitions. Ready to ditch those frustrating moments? Let’s dive into how you can pinpoint the perfect display and stylus setup for your creative journey.
If you’ve faced similar struggles or have questions about your current setup, don’t hesitate to reach out. Together, we’ll find the best solution for your artistic edge.
Now, let’s explore how top-tier pen support and high-resolution displays can revolutionize your digital art experience—starting with the features that truly make a difference.
Select a High-Quality Screen That Meets Creative Demands
First, prioritize a display with at least 4K resolution; this ensures your lines are sharp and details crisp. When I upgraded my old laptop to a 4K screen, I noticed immediate improvements in how detailed my sketches appeared, especially during zoomed-in work in high-res display laptops for digital artists. Ensure the panel uses IPS technology for better color accuracy and viewing angles; TN panels can distort colors and reduce clarity.
Match a Stylus Supporting Precision and Pressure Sensitivity
Choose a stylus that supports 4096 levels of pressure sensitivity to mimic traditional brush strokes. A stylus with tilt support enhances shading control, as I discovered when experimenting with various brushes in Adobe Illustrator. Test pen latency before purchase; a response time under 10ms keeps your strokes fluid. For example, I once tried a stylus with delayed response, which caused jittering in my lines – a frustrating experience that slowed my momentum.
Configure Your Workflow for Peak Efficiency
Install the latest driver software for your stylus and display monitor to unlock full precision and responsiveness. Adjust the calibration settings within your OS and graphic programs to fine-tune pen accuracy. In my own setup, recalibrating my stylus in Windows improved my line straightness in Photoshop, reducing the need for correction.
Leverage Software Settings to Maximize Responsiveness
Within programs like Adobe Illustrator, disable smoothing features during initial sketching phases to preserve raw input fidelity. Later, enable smoothing for cleaner lines when needed. I experienced better control by toggling these features based on my project stage, resulting in a more natural drawing feel.
Maintain Your Hardware for Consistent Performance
Regularly clean your screen and stylus tip to prevent buildup that causes latency or inaccuracy. Use a soft, lint-free cloth for the display and replace stylus nibs as they wear down. During a long project, I noticed smudges on my screen affected my color perception; cleaning it before critical steps kept my color grading accurate.
Test and Adjust for Optimal Results
After setup, perform trial strokes in your preferred software, such as enhance Adobe Illustrator workflow, to identify any lag or inaccuracy. Adjust display refresh rate and pen sensitivity settings based on these tests. I once spent hours tuning these parameters and noticed a drastic improvement in my ability to execute complex designs swiftly.

When selecting a professional-grade design laptop, many enthusiasts focus on the obvious features like resolution specs and stylus pressure sensitivity. However, beneath these surface-level specs lie nuanced details that can dramatically impact your workflow and artistic fidelity. Let’s demystify some misconceptions and share expert insights to help you choose wisely.
First, don’t fall for the myth that more pressure levels automatically mean better control. Many believe that 4096 levels of pressure sensitivity will yield perfect brush strokes every time. In reality, the hardware’s responsiveness, calibration, and driver implementation play crucial roles. Even with high pressure counts, if the stylus response isn’t optimized or if there’s significant latency, your strokes will feel unnatural and frustrating. According to a study from Adobe, response delays over 10ms diminish the natural feel of digital drawing, emphasizing the importance of hardware fine-tuning.
Next, assume that all high-res displays are created equal when it comes to color accuracy and performance. Many new artists overlook the importance of the panel’s color gamut, response time, and anti-glare coating. IPS panels with 100% Adobe RGB coverage offer the best color fidelity for detailed work, especially in software like Adobe Illustrator. Moreover, a higher refresh rate, like 120Hz or above, can significantly reduce input lag, providing smoother strokes during rapid sketching. This is why it’s worth investing in a display that balances resolution with quality rather than chasing megapixels alone.
Another common trap involves the misconception that faster or more advanced stylus technology always guarantees better results. Some brands tout proprietary stylus features that, upon closer inspection, offer marginal improvements at best. The key is compatibility and driver support; even the most sophisticated stylus won’t perform well if the laptop’s drivers are outdated or poorly optimized. For sustained creative work, ensure your device supports the latest driver standards, and consider reading reviews from other artists who test pen input latency and precision in real-world scenarios.
Ever wonder why some stylus support seems inconsistent across different software? This leads to an often-overlooked nuance: the importance of software-side calibration and configuration—not just hardware specs. Programs like Adobe Illustrator provide customizable pressure curves and stabilization settings that can compensate for hardware limitations. Mastering these adjustments can turn a decent device into a powerful creative tool, so don’t neglect the software tuning aspect. For tips on optimizing your workflow, check out this guide.
Furthermore, I advise caution against assuming that every high-resolution display is suitable for detailed vector work. Some screens may have high pixel counts but suffer from poor color calibration or narrow viewing angles, which distort your perception of color and shape. Visiting a physical store to test the display or relying on reputable reviews can save you from costly mistakes. Remember, the goal is not just sharpness but accuracy and consistency—key for professional-grade design work.
What about the hidden trap of hardware longevity? Investing in premium stylus and display features is worthwhile, but only if your device maintains performance over time. Wear and tear on nibs, dust accumulation, and calibration drift can degrade performance. Regular maintenance, driver updates, and understanding calibration procedures are vital habits. Neglecting these can transform an initially excellent setup into an underperforming tool after a few months.
In closing, the world of digital art hardware is filled with subtle pitfalls that can hinder your creative potential. By digging deeper into stylus responsiveness, display quality, software calibration, and maintenance, you’ll be better equipped to make informed choices. If you want the most detailed product comparisons or practical tips, explore our curated list of top design laptops. Have you ever fallen into this trap? Let me know in the comments.
How Do I Maintain My Creative Tools Over Time?
Maintaining your stylus, display, and software is essential for consistent performance and preventing costly issues down the line. I personally schedule weekly cleanings of my stylus tip with a soft cloth and gentle alcohol solution, which keeps response latency minimal and avoids nib wear that can cause jittery lines. Regular calibration of the display’s color settings ensures color accuracy, vital when working on professional projects. Some essential tools I rely on include compressed air cans for dust removal and specialized cleaning wipes sensitive to screens and stylus tips. Setting reminders to update drivers and firmware also keeps compatibility optimal, avoiding crashes and input lag that can break your flow. Predicting future trends, hardware durability will become even more critical as software demands increase, making maintenance more than just a habit—it’s a necessity.
Best Equipment to Support Your Workflow
I strongly recommend investing in the stylus support tools that optimize precision and responsiveness. For example, a high-quality nib replacement kit can restore pen sensitivity after months of use, ensuring your lines stay crisp and accurate. Additionally, using a calibration tool like a colorimeter can maintain the monitor’s color fidelity, especially important for detailed vector work in Adobe Illustrator. Choosing equipment with reliable build quality also minimizes long-term failure risks. I’ve noticed that hardware with better heat dissipation lasts longer and maintains smoother performance during intensive sessions. As I see many designers gravitating toward ultra-high resolution displays, protecting these investments with proper cleaning and calibration is paramount.
Future-Proofing Your Creative Environment
Looking ahead, I believe that modular and easily upgradable components will become more prominent. Modular stylus tips, swappable display panels, and software that adapts seamlessly to hardware updates are trends pointing toward sustainability and long-term utility. Implementing proactive maintenance routines now will prepare you for these advancements, ensuring your workspace remains efficient and cutting-edge. For a comprehensive list of current top-tier tools, you can browse our latest recommended equipment. Start small—try calibrating your monitor with a colorimeter this week and observe how your color accuracy improves, making your work more precise and vibrant.
The Hardest Lesson I Learned About stylus support,adobe illustrator,pen input,hi res display,design laptop
One of the most impactful lessons I encountered was realizing that hardware specifications alone don’t guarantee a seamless creative process. Even with a stylus boasting thousands of pressure levels or a 4K display, if your device’s response feels sluggish or inconsistent, your workflow suffers. The real game-changer was mastering calibration and software tweaks to align hardware performance with my artistic intentions. This taught me to look beyond specs and focus on the harmony between hardware and software to truly elevate my craft.
My Top Picks for Elevating Digital Art Journeys
- XP-Pen Artist Pro: A stylus and tablet combo with superb pressure sensitivity and tilt support, trusted for its reliability and natural feel.
- ColorMunki Smile: A calibration tool I use regularly to maintain accurate colors, ensuring my artwork remains true to my vision.
- Adobe Creative Cloud: The suite offers customizable settings and smoothing options that can be fine-tuned for optimal responsiveness—something I highly recommend exploring.
- Exploring the Best Hi-Res Displays for Laptop Artists: This resource helped me understand how display qualities affect color fidelity and detail in my work, guiding my hardware investments.
Your Turn to Embrace the Digital Canvas
Investing time into understanding and maintaining your stylus, display, and software calibration isn’t just about technical mastery—it’s about unlocking your full creative potential. The tools are at your fingertips, waiting to respond to your vision. Remember, the journey to mastering your digital workspace is ongoing, and every tweak and upgrade brings you closer to the artistry you aspire to achieve. Ready to push your creative boundaries? Dive into the resources and start experimenting today.
Have you ever struggled with calibration or responsiveness in your digital art setup? Share your experiences below—I’d love to hear how you overcome these challenges!